


FEBRUARY 20, 2025
How to Achieve the Stunning Glass Manicure Nail Art Trend in Just a Few Steps
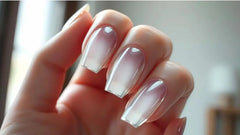
Ever wondered how some people manage to make their nails look like tiny, shimmering pieces of art? 💎 The secret lies in the glass nail trend, a style that’s taking the beauty world by storm. Inspired by the flawless, reflective finish of glass skin and hair, this look is all about achieving a high-shine, almost ethereal effect.
Whether you’re a DIY enthusiast or prefer salon visits, this guide will walk you through the steps to create this mesmerizing look. From choosing the right shades to mastering the technique, we’ve got you covered. Plus, we’ll share insider tips and seasonal design ideas to keep your style fresh and on-trend.
Ready to step into the world of stunning nail art? Start your journey today… Sign up for our FREE Nail Newsletter now and be the first to get all the hottest updates! Click the link below to join! 💌👇
Key Takeaways
- The glass nail trend is inspired by glass skin and hair, offering a high-shine finish.
- It’s accessible for both DIY enthusiasts and salon-goers.
- Trending colors include blue, purple, and red for a dramatic effect.
- Use magnetic polish and a glossy top coat for the best results.
- This style is versatile, neutral, and perfect for any occasion.
Introduction to the Stunning Glass Nail Look
What’s the secret behind those ultra-glossy, mirror-like finishes that catch everyone’s eye? 💎 It’s all about the glass nail trend, a style that’s taken the beauty world by storm. Inspired by the flawless, reflective finish of glass skin, this look is all about achieving a high-shine, almost ethereal effect.
The Rise of the Glass Nail Trend
This trend first gained traction in Korea, where beauty innovations often set global standards. Its popularity skyrocketed in the U.S. thanks to influencers and celebrities who embraced the look. The glass-like finish offers a modern twist on classic chrome, making it perfect for those who love a subtle yet striking style.
Salons quickly adopted the trend, offering clients a way to achieve that coveted reflective effect. DIY enthusiasts also jumped on board, thanks to accessible products like magnetic gel polish. Whether you prefer bold colors or sheer nudes, this trend is versatile and timeless.
The Appeal of a High-Shine Finish
Why is this look so irresistible? The high-shine finish gives nails a luxurious, “expensive” appearance. It’s all about the way light reflects off the surface, creating a mesmerizing effect. A sheer base coat enhances the natural beauty of your nails, while layers of gel polish add depth and dimension.
Here’s a quick breakdown of why this trend is a must-try:
Feature | Benefit |
Reflective Finish | Creates a luxurious, eye-catching look |
Sheer Base Colors | Enhances natural nail beauty |
| Magnetic Gel Polish | Adds depth and dimension |
Ready to dive into this trend? Stay tuned for our next section, where we’ll share the tools and techniques to achieve this stunning look at home or in the salon. 💅✨
Glass Manicure Nail Art Trend: Techniques and Styling Tips
Curious about the tools and tricks behind that flawless, high-shine look? 💎 Whether you’re a DIY enthusiast or a salon regular, mastering this style is easier than you think. Let’s dive into the essentials and techniques to create that stunning, reflective finish.
Tools and Materials Needed
To achieve that perfect glass nail effect, you’ll need the right tools. Start with a high-quality gel polish and a reliable top coat. An LED lamp is essential for curing the layers, ensuring a long-lasting finish. Don’t forget a magnetic wand—this little tool is key to creating that signature reflective look.
Here’s a quick checklist of must-haves:
- LED lamp for curing
- Magnetic wand for reflective effects
- Base coat and top coat
- Sheer or iridescent gel polish
Achieving a Reflective, Glasslike Effect
Start with a clean, well-prepped surface. Apply a thin layer of base coat and cure it under the LED lamp. Next, add your chosen gel polish, using the magnetic wand to create that mesmerizing shine. Repeat the process for depth, and finish with a glossy top coat to seal the look.
Professional artists recommend experimenting with sheer nudes or bold colors for different effects. Remember, precision is key—take your time to ensure each layer is smooth and even.
Step-by-Step Guide for a DIY Glass Manicure
Ready to create a dazzling, high-shine look on your own? 💅 This DIY guide will walk you through every step to achieve that stunning, reflective finish. From prepping your nails to adding the final touches, we’ve got you covered.
Nail Preparation and Base Coat Application
Start with clean, well-prepped nails. Trim, shape, and buff them for a smooth surface. Apply a thin layer of base coat to protect your nails and ensure better adhesion. Cure it under an LED lamp for 30 seconds.
Pro Tip: Avoid skipping the base coat—it’s crucial for a long-lasting manicure.
Layering with Sheer and Magnetic Gel
Next, apply a sheer or iridescent nail polish. Use a magnetic wand to create that signature reflective shine. Hold the wand over each nail for 10-15 seconds to achieve the desired effect. Cure under the LED lamp after each layer.
Experiment with colors like blue, purple, or red for a bold look. Sheer nudes work great for a subtle, elegant finish.
Finishing Touches and Top Coats
Seal your manicure with a glossy top coat. This step locks in the shine and adds durability. Cure it under the LED lamp for a final 60 seconds. For extra protection, apply cuticle oil to keep your nails healthy.
Pro Tip: Reapply the top coat every few days to extend the life of your manicure.
Choosing the Best Products for Your Glass Nail Look
Want to nail that glossy, reflective finish? 💅 The right products make all the difference. Whether you’re a DIY pro or prefer salon visits, we’ve got the scoop on the best gel polishes and brands to achieve that stunning effect.

Top Gel Polishes and Lacquers
Not all polishes are created equal. For that high-shine, iridescent look, opt for brands like Rolita and Gelish. These products are loved by nail artists for their smooth application and long-lasting finish.
Here are some top picks:
- Rolita Magnetic Gel Polish: Perfect for creating a reflective effect.
- Gelish Mini Soak-Off Gel Polish: Offers a sheer, natural look.
- OPI Happy Anniversary Nail Lacquer: Adds a metallic touch for extra shine.
Preferred Brands and Recommendations
When it comes to brands, professional nail artists swear by Rolita and Gelish. These products are salon-approved and deliver consistent results. For a DIY-friendly option, try Nailboo’s Max Gloss Top Coat. It’s affordable and easy to apply.
Pro Tip: Always use a base coat to protect your nails and extend the life of your polish. Pair it with a glossy top coat for that extra shine.
Expert Tricks for a Salon-Quality Glass Manicure
Looking to elevate your DIY skills to a professional level? 💅 Achieving that flawless, high-shine finish doesn’t have to be a mystery. With a few insider tips from top artists, you can create a salon-worthy look right at home.
Insider Tips from Professional Nail Artists
Start with a clean, well-prepped surface. Celebrity artist Mazz Hanna recommends using a high-quality base coat to ensure longevity. "A smooth base is key to that reflective finish," she says. Cure each layer under an LED lamp for the best results.
For the magnetic gel effect, hold the wand steady over each nail for 10-15 seconds. This technique creates depth and dimension, giving that signature shine. Experiment with colors like red or pink for a bold statement.
Here are some pro-approved shortcuts:
- Use a dual-ended cuticle pusher for precise application.
- Reapply top coat every few days to maintain shine.
- Invest in a quality LED lamp for even curing.
Troubleshooting? If the magnetic effect isn’t sharp, check the gel consistency. Too thick or thin can affect the result. Adjust the wand angle for a more defined look.
Seasonal Inspirations and Trending Glass Nail Designs
Seasonal shifts bring fresh inspiration to your beauty routine. 🌟 This year, fall and winter are all about bold shades and reflective finishes. From deep burgundy to icy silver, these trends are taking hollywood and social media by storm.

Celebrities and influencers are setting the tone with stunning shimmer looks. Think forest green for a cozy vibe or navy for a chic, modern twist. These designs are perfect for any occasion, from holiday parties to casual outings.
Fall and Winter Color Variations
This season, earthy tones are a must-try. Shades like burgundy, forest green, and navy dominate the scene. For a festive touch, add a chrome finish or shimmer top coat. These colors are versatile and pair beautifully with any outfit.
Here’s a quick guide to trending shades:
| Color Seasonal | Vibe |
| Burgundy | Warm and cozy |
| Forest Green | Nature-inspired |
| Navy | Chic and modern |
Celebrity and Social Media Influences
From TikTok to Instagram, influencers are showcasing their take on the glass look. Celebrities like Rihanna and Zendaya are rocking bold, reflective designs. These looks are a part of the editorial trends that dominate this year.
For a fun twist, mix subtle neutrals with bold accents. Try a sheer base with a chrome stripe or add a shimmer gradient. These ideas are perfect for experimenting and sharing your creations online.
Pricing, Care, and Long-Term Maintenance
Thinking about achieving that glossy, mirror-like finish without breaking the bank? 💸 Whether you’re a salon regular or a DIY enthusiast, understanding the costs and upkeep is key to keeping your look fresh and flawless.
Salon vs. DIY Cost Comparisons
Professional services for this high-shine style typically range from $50 to $75, depending on your location. In cities like New York or Los Angeles, prices can go even higher. On the other hand, a DIY kit costs around $30-$50 and can be reused multiple times, making it a budget-friendly option.
Here’s a quick breakdown of costs in major cities:
| City | Salon Price | DIY Kit Cost |
| New York | $75 | $50 |
| Los Angeles | $70 | $45 |
| Chicago | $60 | $40 |
Long-Term Maintenance Tips
To keep that reflective effect intact, proper care is essential. Start with a clean base and always prep your skin and nails before application. Use a high-quality top coat to seal the look and reapply it every few days to maintain shine.
Here are some aftercare tips:
- Moisturize your skin and cuticles daily to prevent dryness.
- Avoid harsh chemicals that can dull the finish.
- Invest in a good base coat to protect your nails.
Budget-Friendly vs. Premium Options
For those on a budget, brands like Nailboo offer affordable kits that deliver great results. If you’re looking for premium quality, Rolita and Gelish are salon-approved favorites. Both options work well, so choose based on your lifestyle and preferences.
Pro Tip: Proper preparation saves time and ensures your look lasts longer. Whether you opt for a nude shade or a bold color, the right care routine keeps your style flawless.
Conclusion
Transform your look with a high-shine finish that turns heads. 💎 By following the steps in this guide, you can achieve a salon-quality effect at home. Start with a clean base, apply your favorite polish, and seal it with a glossy top coat for that perfect shimmer.
This style is versatile, chic, and perfect for any occasion. Whether you’re a DIY enthusiast or prefer professional help, the results are stunning. Experiment with colors and techniques to make it your own. Don’t forget to share your creations using #NailDaVinci!
💅 Ready to step into the world of stunning beauty? Start your journey today… Sign up for our FREE Newsletter now and be the first to get all the hottest updates! Click the link below to join! 💌👇
FAQ
What is the glass nail trend all about?
It’s a high-shine, reflective style that mimics the look of glass. Think sheer, glossy, and ultra-polished—perfect for a chic, minimalist vibe. ✨
What products do I need for a DIY glass manicure?
Grab a base coat, sheer gel polish, magnetic gel for depth, and a top coat for that glossy finish. Don’t forget a UV/LED lamp for curing! 💅
How do I make my nails look reflective?
Layer sheer shades with a magnetic gel to create depth. Finish with a high-shine top coat to amplify the glass-like effect. ✨
Can I achieve this look at home?
Absolutely! With the right tools and a bit of practice, you can nail this trend from the comfort of your couch. 🏠
What are the best gel polishes for this trend?
Brands like OPI, Essie, and Gelish offer sheer, high-shine options that work perfectly for the glass effect. 💖
How long does a glass manicure last?
With proper prep and care, it can last up to 2-3 weeks. Just avoid harsh chemicals and keep your hands moisturized! 🌟
Are there seasonal variations for this trend?
Yes! In fall and winter, try deeper nudes or shimmering reds. For spring and summer, opt for soft pinks or sheer neutrals. 🌸🍂
How much does a salon glass manicure cost?
Prices vary, but expect to pay between $40-$60, depending on the salon and location. DIY is a budget-friendly alternative! 💰

Step-by-Step Application and Layering Tips
Start with a clean, well-prepped nail surface. Apply a gel base coat to ensure longevity and a smooth finish. Isabel May recommends using a sheer, milky polish as your first layer to mimic the natural glow of an opal.
Next, add a second layer of translucent gel polish. This creates depth and allows the iridescent topcoat to shine. For a more dramatic effect, use nail foils or iridescent powders between layers. Cure each coat under a UV or LED lamp for a flawless finish.
Finish with a high-shine top coat to lock in the shimmer. This step is crucial for achieving that salon-quality look. Remember, patience is key—take your time to perfect each layer.
Tools and Products to Elevate Your Look
To create a stunning opal effect, you’ll need the right tools. Fine brushes are essential for precise application, while high-performance gel systems ensure durability. Products like OPI’s Glazed N’ Amused are perfect for achieving that dreamy, holographic finish.
Nail foils and iridescent powders add an extra layer of dimension. These products are easy to use and can transform your manicure into a work of art. Don’t forget a good-quality UV or LED lamp to cure each layer effectively.
Top Picks and Reviews: Must-Have Polishes for Opal Effects
Looking for a polish that’s as mesmerizing as a gemstone? 🌟 We’ve rounded up the best-selling products that deliver that dreamy, iridescent effect. From sheer finishes to bold chromatic pops, these picks are perfect for creating a look that’s uniquely yours.
Highlighting Best-Selling Opal Nail Polishes
Ella + Mila’s Everglow is a fan favorite for its soft, pearly base and holographic shimmer. Beauty influencer Sarah Thompson raves, “It’s the perfect balance of subtle and stunning.” Available at Ulta for $12.99, it’s a steal for its quality.
Addiction Tokyo’s Opal Moon is another standout. This nail polish features a milky base with iridescent flakes that shift colors in the light. Nail artist Mia Lopez says, “It’s like wearing a piece of the moon on your fingertips.” You can grab it on Amazon for $14.50.
Comparing Formulas and Finishes
Not all polishes are created equal. Sheer formulas like OPI’s Glinda the Good! are ideal for a soft, everyday look. For a bolder statement, try Londontown’s Chromatic Shimmer, which delivers a high-gloss finish with intense color shifts.
Here’s a quick comparison:
ProductFinishPrice
| Ella + Mila Everglow | Sheer with holographic shimmer | $12.99 |
| Addiction Tokyo Opal Moon | Milky with iridescent flakes | $14.50 |
| OPI Glinda the Good! | Soft pearly base | $11.99 |
Insights from Nail Artists
Nail artist Zinya Langsford shares, “The key to achieving that opal effect is layering. Start with a sheer base, add iridescent powders, and finish with a high-shine top coat.” This technique ensures a multidimensional look that’s both durable and eye-catching.
Another pro tip from artist Isabel May: “Experiment with foils and glitters to create your own unique blend. It’s all about playing with light and texture.”
Embracing the Trend on Social Media & Creative Inspiration
Want to see your creativity shine across social media? 🌟 Platforms like Instagram and TikTok are buzzing with stunning designs that showcase the rainbow opal effect. It’s the perfect way to connect with a community that loves experimenting with beauty trends. Share Your Art with #NailDaVinci
Join the digital conversation by using the hashtag #NailDaVinci. Whether you’re a beginner or a pro, sharing your creations can inspire others and help you grow your skills. It’s a fun way to see how others interpret this trend and get feedback on your own designs.
Inspiration from Top Nail Artists on Instagram and TikTok
Influencers like Zinya Langsford and Brooke Shunatona are leading the charge with their innovative takes on this trend. From intricate layering techniques to bold color shifts, their posts are a treasure trove of ideas. “It’s all about playing with light and texture,” says Langsford.
Don’t be afraid to tweak your design for a unique result. Add foils, glitters, or even 3D elements to make your nail art stand out. The beauty of this trend is its versatility—there’s no wrong way to do it.
💅🏼 Ready to step into the world of stunning nail art? Start your journey today and show off your creations with #NailDaVinci on Instagram, TikTok, Pinterest, and Facebook!
✨ Want the latest nail trends, must-know tips, and easy-to-follow nail art tutorials delivered straight to your inbox? Sign up for our FREE Nail Newsletter now and be the first to get all the hottest updates! Click the link below to join! 💌👇
Conclusion
Step into a world where your fingertips tell a story of shimmer and shine. 🌟 This trend blends soft pastels with holographic finishes, creating a look that’s both magical and versatile. Whether you prefer a subtle manicure or a bold statement, the possibilities are endless.
From layering techniques to top product picks, achieving this dreamy effect is easier than ever. Experiment with different polish formulas and finishes to find your perfect match. The key is to have fun and let your creativity flow.
Join the digital beauty community by sharing your creations with #NailDaVinci. Your unique result could inspire others to try something new. Don’t forget to sign up for our FREE newsletter to stay updated on the latest tips and trends. 💌
💅🏼 Ready to make your mark? Start your journey today and let your fingertips shine!
FAQ
What makes iridescent opal nails so unique?
The rainbow-like shimmer and color-shifting effect give these designs a mesmerizing, ethereal look. It’s like wearing a piece of the ocean on your fingertips! 🌊✨
How can I achieve the opal effect at home?
Start with a sheer base coat, then layer iridescent polishes or chrome powders. Finish with a glossy top coat for that dreamy, reflective finish. 💅🌈
What are the best polishes for creating this look?
Brands like Essie, OPI, and Holo Taco offer stunning sheer iridescent shades and gel polishes that mimic the opal effect perfectly. 🎨✨
Can I customize the opal look to match my style?
Absolutely! Go for soft pastels for a subtle vibe or bold chromatic finishes for a statement look. Add glitter or foil accents for extra flair. 🌟💖
How do I make my opal manicure last longer?
Use a quality base coat, seal with a gel top coat, and avoid harsh chemicals. Regular touch-ups will keep your iridescent beauty looking fresh. 💎🛡️
Where can I find inspiration for opal nail designs?
Check out Instagram and TikTok using hashtags like #NailDaVinci or follow top nail artists for creative ideas and tutorials. 📱🎨
The Latest Nail News
2025-02-22 20:38
How to Achieve the Stunning Glass Nail Art Trend in Just a Few Steps
Read Article >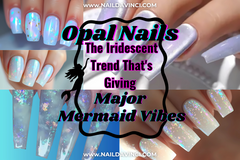
2025-02-20 18:03
New Opal Nails: The Iridescent Trend That’s Giving Major Mermaid Vibes
Read Article >

Add a comment